Getting to know the interface
Computer and large-screen mobile interface
Small-screen mobile interface
Most of the i-Vu® interface is the same on small-screen mobile devices except for the differences shown below.
- When you click
 to hide the tree, the button changes to
  .
. - Help and Print are in the
 menu.
menu.
NOTES
- After you log in, you will see the page defined as your starting location on the My Settings page. To change your opening page, see To change My Settings.
- Roles/privileges control what an operator can see or do in the i-Vu® system. If you cannot see or do something that you read about in Help, ask your System Administrator to check your role/privileges.
- Use only the i-Vu® interface to navigate; do not use the web browser’s navigation buttons.
- Click on any tab to refresh the page.
|
Click for details below To show, hide, or resize the navigation tree |
|
|
Navigating the system
To navigate in the i-Vu® interface:
- Select the item you want in the navigation tree.
- Select the action buttons and their drop-down lists.
- Use the tabs to filter the information further.
NOTE Use only the i-Vu® interface to navigate; do not use the browser’s navigation buttons.
- Click on any tab to refresh the page.
System Options
Click ![]() and select System Options to view or change the administrative settings in your i-Vu® application.
and select System Options to view or change the administrative settings in your i-Vu® application.
|
|
To show, hide, or resize the navigation tree
On a computer or large screen mobile device
Click ![]() at the top of the navigation tree to hide or show the tree.
at the top of the navigation tree to hide or show the tree.
Click and drag the tab on the right side of the tree to adjust its width.
In the Installer view, click and drag the tab at the top of Arrange User View to adjust the height of the window.
On a small-screen mobile device
Touch ![]() at the top of the navigation tree to hide the tree. Touch
at the top of the navigation tree to hide the tree. Touch ![]() to show it.
to show it.
Double-tap the arrow on the right side of the tree to widen the tree. Double-tap again to return to the original size.
|
|
Zooming in and out
On a computer
- To zoom in and out on the i-Vu® interface:
- Hold down Ctrl and press + or -. Press Ctrl+0 to return to 100%.
- Hold down Ctrl while rolling your mouse wheel.
- Use your web browser's zoom functions.
- If a graphic does not fit in the action pane, right-click it and select Scale to Fit to make it fit the action pane. Select Scale to Fit again to return the graphic to its original size.
On a mobile device
Apple® iPad and iPhone
- Double-tap to zoom in/out.
Microsoft® SurfaceTM
- Pinch-zoom works on individual frames, instead of the whole screen. So, you can zoom and scroll the navigation pane and action pane separately.
- If browser text is too small, use Ctrl + to increase Internet Explorer's zoom level, then reload the page.
GoogleTM NexusTM and Nexus Lumia
- Pinch-zoom to zoom in/out.
|
|
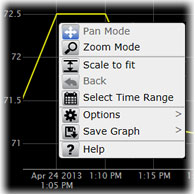
Using right-click menus
On a computer
You can right-click the following items to select options:
A tree item |
The action pane |
|---|---|
|
|
A property |
A trend |
|
|
On a mobile device
To access the right-click menu for:
- A tree item–Select the item first, then touch and hold the item for several seconds.
- The action pane–Touch and hold the item for several seconds.
|
|
To print the action pane
On a computer
Click ![]() at the top of the page to print the contents of the action pane. Set the print orientation to Landscape in the Print dialog box.
at the top of the page to print the contents of the action pane. Set the print orientation to Landscape in the Print dialog box.
![]() TIPS
TIPS
- To print a Graphics page that exceeds the size of the action pane, right-click the graphic and select Scale to Fit.
- If you do not want to print the black background, in your browser's Internet Options dialog box, disable background printing.
On a mobile device
Touch ![]() and then select Print.
and then select Print.
|
|
Colors and status in the i-Vu® interface
The following colors indicate equipment status throughout i-Vu® interface. These colors are visible on Property pages, Graphics pages and in the setpoint graphs.
Color |
Color Name |
Status Code |
Condition Indicated |
|---|---|---|---|
|
Purple |
0 or 15 |
In a controller—non-operational or no communications |
|
Charcoal |
14 |
In a controller—a download is required or is already in progress |
|
Coral |
13 |
Control program error |
|
Red |
2 or 9 |
Heating or cooling alarm |
|
Orange |
8 |
Maximum cooling |
|
Dark blue |
3 |
Maximum heating |
|
Yellow |
7 |
Moderate cooling |
|
Light blue |
4 |
Moderate heating |
|
Grey |
1 |
Unoccupied/inactive |
|
White |
10 |
Occupied/active |
|
Light green |
6 |
Free cooling |
|
Green |
5 |
In a controller—operational or operational read-only |
|
|
Colors and setpoints
Thermographic colors indicate how much a zone’s actual temperature differs from its setpoints.
Five conditions may affect a zone’s thermographic color:
- Setpoint adjust
- Timed local override (TLO)
- Optimal start
- Demand level
- Hysteresis
In the examples below, a zone’s heating occupied setpoint is 70° and its cooling occupied setpoint is 74°.
If you normally see... |
when the zone temp is... |
but... |
then you will see... |
green
|
72.5° |
someone adjusts the setpoints (for example, with a setpoint adjust of two degrees, the new setpoints would be 68 and 72°) |
yellow
|
gray
|
73° (unoccupied) |
someone presses the Override button on a zone sensor to use the occupied setpoints |
green
|
gray
|
77° (unoccupied) |
the zone is in optimal start and is ramping up to its occupied setpoint in the few hours before occupancy |
an occupied color |
yellow
|
75° |
the zone’s electric meter is in demand level 2 with relaxed setpoints of 68 and 76° |
green
|
green
|
73.5° |
cooling began when the temperature rose above 74° and the temperature has not yet dropped beyond the 1° hysteresis (to 73°) |
yellow
|