Setting up alarm actions
Alarm Action - An action that the i-Vu® application performs to notify personnel of an alarm or to record information about the alarm. You can assign alarm actions to an alarm source, a category of alarm sources, alarm sources from a certain location, or a combination of these criteria.
To assign alarm actions to alarm sources:
Although you can assign an alarm action to an individual alarm source, you typically assign an action to multiple alarm sources at the area or equipment level. The alarm action applies to all instances of the alarm sources at the selected location and below. Click an action’s Edit button to make any changes.
To assign an alarm action to alarm sources:
- On the navigation tree, select the area or equipment, containing the alarm sources.
- Click Alarms > Actions tab and follow the 3 steps on the screen.
NOTE Use Ctrl+click, Shift+click, or both to select multiple items.
- Click Add.
- Set up the alarm action by editing the fields on the alarm action page. See the appropriate alarm action below for field descriptions.
- Click OK.
|
Click for details below |
|
|
Alarm Popup
The Alarm Popup alarm action pops up a message on any computer with a Windows operating system that is running the i-Vu® Alarm Notification Client application.
Field |
Notes |
|---|---|
To Operator |
Select individual operators or operator groups who should receive alarm notification. |
Generate alarm if delivery fails |
Select this checkbox to generate a System Info alarm if the popup recipient is not currently running the Alarm Notification Client application. |
Message text |
Use punctuation, spaces, or returns after the entries to format the text. |
Append Field Code |
Add field codes to the message text if desired. |
Perform Action |
By default, the i-Vu® application performs an alarm action when the alarm source generates an alarm and when it returns to normal. Under Perform Action, you can choose to run the alarm action only when the alarm source generates an alarm or when it returns to normal. |
Using the Alarm Notification Client application
The Alarm Notification Client application must be running on each client computer (Windows only) that should receive popup notifications. Keep the application minimized to the right side of the Windows task bar. The window will pop up with a message when an alarm occurs.
NOTE To use the i-Vu® Alarm Notification Client application across a firewall, you must open UDP port 47806.
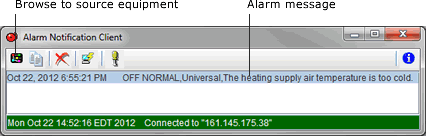
Select an alarm message, then click ![]() to open i-Vu® displaying the piece of equipment that generated the alarm. A grayed out alarm indicates that it was acknowledged in the i-Vu® interface.
to open i-Vu® displaying the piece of equipment that generated the alarm. A grayed out alarm indicates that it was acknowledged in the i-Vu® interface.
If the Alarm Notification Client is set up to play a continuous alarm sound, you can silence an alarm by clicking Silence!, by pressing Ctrl+S, or by acknowledging the alarm in the i-Vu® interface.
Button |
Notes |
|
|---|---|---|
|
Opens the i-Vu® interface displaying the equipment that generated the alarm. |
|
|
Copies the selected alarm information to the clipboard. |
|
|
Removes the alarm information from the alarm popup list. Removing items from this list has no effect on the alarms list in the i-Vu® interface. |
|
|
View information about the server connection. |
|
|
On this tab... |
You define... |
|
Server Connection |
The i-Vu® web server and port, and the i-Vu® operator name and password |
|
Browse To |
The i-Vu® page that you want to see first when browsing to the equipment |
|
Notification Sounds |
NOTE If multiple types of alarms occur simultaneously, the application plays the sound of the most critical alarm (Connection Failure first, then Critical, then Normal). |
To set up the i-Vu® application to support Alarm Popup clients
- Click
 , then select System Options > General tab, and then select Enable support for Alarm Notification Clients to connect to this server.
 - Leave Restrict to IP Address field blank.
- Use the default port.
- Click Accept.
NOTE If the Alarm Notification Client application is not on the local network and will access i-Vu® alarms through a NAT router, your Network Administrator must port forward the TCP port you defined in step 3 above.
To install the Alarm Notification Client application
Follow the steps below on each client computer that should receive alarm popups.
PREREQUISITE You must enable Alarm Popup support in System Options > General tab. See above topic. Click ![]() , then select System Options > General tab, and then check Enable support for Alarm Notification Clients to connect to this server.
, then select System Options > General tab, and then check Enable support for Alarm Notification Clients to connect to this server.
- Install software from your Tech Tools DVD.
- Click Alarm Popup Application.
- Click Run, then follow the on-screen instructions to install the Alarm Notification Client application. After you click Done, the application starts automatically.
NOTE To locate your applicable IP address, look in the Management Tool.
- In the Settings dialog box, enter appropriate values. You can also click
 to open this box. See the table above for a description of each setting.
 NOTE You can lock the Settings so that a user cannot edit them. See To lock a client's Settings feature below.
- Click OK.
- Minimize the Alarm Notification Client window.
To lock a client's Settings feature
To prevent a user from editing the Settings ![]() :
:
- Right-click Alarm Notification Client in the Windows Start menu.
- Select Properties.
- On the Shortcut tab, type
-lockconfigat the end of the Target path.

|
|
Send E-mail
The Send E-mail alarm action sends a message to one or more e-mail accounts. The alarm action can also run a report and attach it to the e-mail as a PDF, HTML, or XLS file.
Field |
Notes |
|---|---|
To |
Type the address(es) that you want to send the alarm to. To enter multiple addresses, type a space or press Enter after each address. |
From |
Enter a valid address if required by your mailserver. |
Mail Host |
The mailserver's address. This can be an IP address or a system name, such as mail.mycompany.com. |
Mail Host Port |
Change this field if using a port other than the default port 25. |
Mail Host Security Options |
Select the type of security the mailserver uses.
|
Specify Mail User For Mail Host Authentication |
Select if your mailserver requires a username and password. |
Send mail as MIME attachment |
Select if your mailserver allows only MIME attachments. |
Message Text |
Use punctuation, spaces, or returns after the entries to format the text. |
Attach Report |
Select to attach a report to the e-mail, then select the Report and the Format. The attached report will include the date and time. For example, Alarm Sources 2012 Jan 01 1230. NOTE The Report Name field shows a custom report only if it was created at the current system level. Run as shows the name and login name of the operator creating the alarm action. The report will be run using the privileges and report options of this operator.
|
Perform Action |
By default, the i-Vu® application performs an alarm action when the alarm source generates an alarm and when it returns to normal. Under Perform Action, you can choose to run the alarm action:
|
NOTE You should not assign this alarm action to frequently-occurring alarms as this may cause problems on your network or the Internet.