Managing setpoints
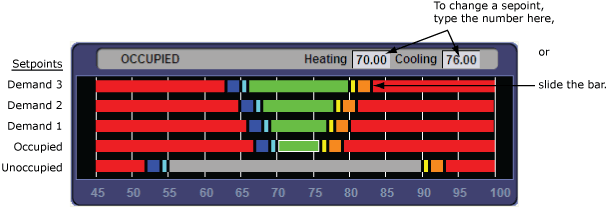
The Setpoint graphic shown on a standard equipment graphic indicates the base setpoint values (Occupied High/Low, Unoccupied High/Low). The i-Vu® application reads these values back periodically, typically within 10 seconds. The timing can vary based on network traffic, the number of controllers in the database, and several other variables. Setpoints that are changed in the field via another user interface are displayed in the i-Vu® interface as soon as they are detected.
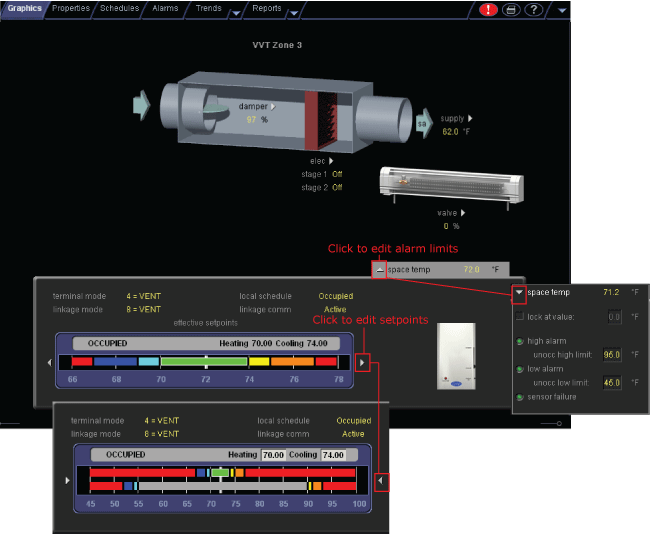
You can, at any time, change the setpoints from i-Vu® graphics by using the slider or by entering numeric values directly. Updated setpoints are transmitted to the controller when you Accept the changes. Setpoints can also be changed on the Properties page > Control Program tab > Space Temperature and Setpoints. or Configuration > Setpoints.
NOTE Power and Standard operators may only edit Occupied/Unoccupied and Heating/Cooling setpoints. They cannot edit Demand levels or more detailed setpoint parameters.
The various color bars indicate adherence to or deviation from the setpoint. You can change the current default settings for setpoint deviation. Select a color band on the setpoint graph to see the current setpoints in the Heating and Cooling fields. The values in this graphic are Fahrenheit. See setpoint descriptions below.
NOTE This graphic is an example only. Your setpoints may differ.

Color |
|
Condition |
|---|---|---|
|
Green |
Temperature is within the Occupied Low and High Setpoint |
|
Grey |
Temperature is within the Unoccupied Low and High Setpoint |
|
Light Blue |
Temperature is less than 2°F below the Occupied Low Setpoint |
|
Dark Blue |
Temperature is more than 2°F below the effective Low Setpoint but less than 4°F below the effective Low Setpoint
|
|
Yellow |
Temperature is less than 2°F above the effective High Setpoint |
|
Orange |
Temperature is more than 2°F above the effective High Setpoint but less than 4°F above the effective High Setpoint
|
|
Red |
Temperature is more than 4°F above or below the effective setpoints
|

|
Click for details below |
Adjust setpoints
- Programmed setpoints are set and changed by operators.
- Effective setpoints reflect the impact of other system conditions on the programmed setpoints, such as setpoint adjustments, and hysteresis. Effective setpoints control the equipment.
To change programmed setpoints:
- Navigate to a setpoint control in one of the following places:
- Properties page > Control Program tab > Configuration > Setpoints
- The setpoint microblock pop-up on a Logic page
- A Graphics page (Click a setpoint trend graph control to access the editable setpoint bar.)
- Make changes on a programmed setpoint bar by either:
- Clicking and dragging the segment or the gap between segments
- Typing new values in the Heating and Cooling fields
- Click Accept.
Demand Control
Demand Control is a cost-saving strategy that saves energy while maintaining comfort in the following ways:
- Controlling energy use to avoid peak demand, ratchet, or time of use utility charges
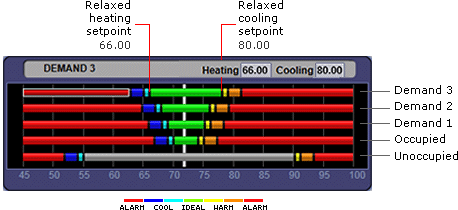
- Maintaining ventilation at relaxed setpoints rather than shutting down equipment (as with load shedding or duty cycling)
Before you can use Demand Control effectively, you must:
- Obtain details regarding past energy usage and peak demand, ratchet, and time of use charges from your energy provider.
- Understand the demand profiles of the zones you are controlling.
Demand Control can be customized at the zone level. For example, you may relax the setpoints in some zones, like break rooms and closets, by a few degrees, but you may not want to relax setpoints in computer rooms at all.

To define Demand Control properties
- On the navigation tree, select the electric meter.
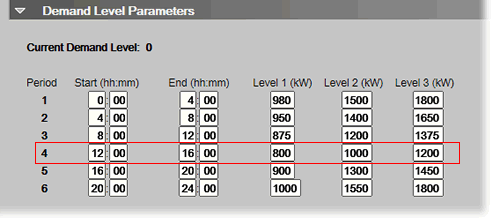
- Select Properties > Control Program and expand the Demand Level Parameters section.
- Type the Start and End time to define the time period that you want demand control to be in effect for this zone.
- Type kilowatts per hour (kW/hr) in the Level columns to define the amount of power that the demand must exceed before the i-Vu® system calls for a higher demand level.
NOTE Levels are defined in the electric meter control program in the Snap application. You can test the Demand Levels by locking the meter to a value.
In the example below, during Period 4, defined as 12:00 (noon) to 16:00 (4:00 p.m.), if the demand exceeds 800 kW/hr, the i-Vu® system will use Demand Level 1 setpoints. If the demand exceeds 1000 kW/hr, the i-Vu® system will use Demand Level 2 level setpoints and so on.
